
![]()
An introduction to structured maze design
Ever wondered how to design your own mazes? Well here's how I designed some of my own, personal favourites. The Drinks tokens, Duvet, Nine crossroads and Walk on walls (see Maze gallery) all owe their existance to this process, which I began to develop in the mid 80s and still often return too, when in need of fresh inspiration. The variations on this theme are virtually limitless, and a carefully designed maze template will produce a multitude of good mazes. I have also experimented with hexagonal (isometric) variations on this theme, samples of which can be found in the Attic gallery.
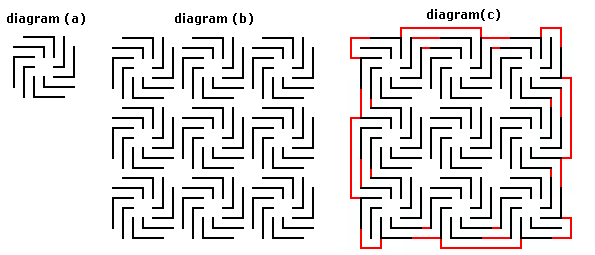
Step 1: Using squared paper, or your favourite graphics software tool, design a small maze building-block that repeats well and leaves just a few gaps. See diagrams (a) and (b) below.
Step 2: Close off the open-ends round the edge of the design following the flow of the design as much as possible. You can choose to dead-end some paths, or link them together in groups. A group of three or more creates a fixed junction in the maze. In diagram (c) I have chosen to link paths in strict pairs creating no dead-ends or junctions. Note that at this point you may choose to leave two open-ends as entry and exit points.
Step 3: Finalise any further fixed sections of the maze, including start and finish points (if not already chosen). Again follow the flow of the design and use symmetry where possible. These fixed sections, like the outside edges, may include dead-ends and junctions. Diagram (d) for example, includes no dead-ends but several junctions.
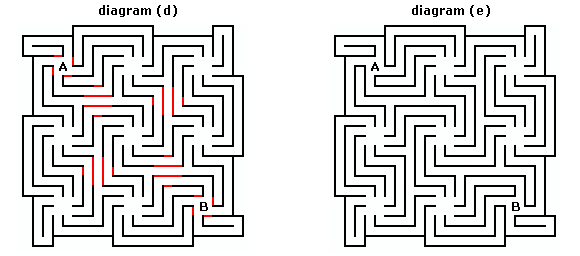
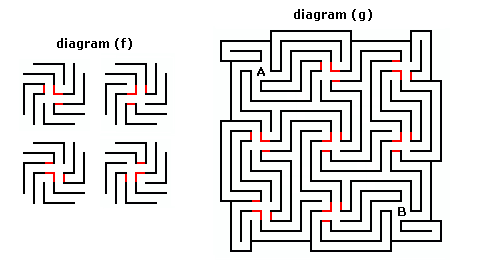
Step 4: Now you have a maze template. See diagram (e). The next stage is to design a selection of plugs that can be used to fill the gaps (nodes). These plugs are the variable element of the maze, give it a degree of randomness and allow many mazes to be drawn from the same template. In this instance I have chosen four plugs which, as it happens, are all the same except for rotation. See diagram (f).
Step 5: Take the template and experiment filling the open nodes with the chosen plugs until you have your final maze with a least one route from 'A' to 'B'. See diagram (g).
material and maze design – © Andrea Gilbert 2000